Run TerminusDB on Windows with Docker
This is an introduction to bringing up a TerminusDB localhost environment with a Docker storage volume on Windows.
This article is divided into three sections for managing a localhost TerminusDB instance and connecting it to DFRNT:
1. Start TerminusDB with a docker volume
# create docker-compose.yml and .env files
# Create the docker volume
$ docker volume create terminusdb_volume
$ docker-compose up -d
# to see running containers
$ docker-compose ps
# to see the logs of running containers
$ docker-compose logs
2. Backup and restore the docker volume
$ docker-compose stop terminusdb-server
$ docker run --rm -it -v "$PWD":/backup -v terminusdb_volume:/terminusdb ubuntu tar cfz /backup/backup.tar.gz /terminusdb
$ docker-compose up -d terminusdb-server
# Use the `MSYS_NO_PATHCONV=1` prefix to avoid Cygwin path conversion on Windows
3. Connect DFRNT to your TerminusDB
- Create a DFRNT instance connection at https://dfrnt.com/modeller/settings/apikeys towards localhost (requires subscription) with a port such as 6363
- Create a pointer to a branch in existing or new data product
- Explore the data product through the landing page
Things to consider
These instuctions are not suited for running TerminusDB in production. They expect some familiarity with using a command line interface. The instructions are fairly similar if using other platforms like macOS and Linux.
You will need to have installed Docker Desktop on Windows already. This setup is an alternative to the official TerminusDB Docker Bootstrap configuration that you want wish to try first.
One of the reasons for a plain docker setup is to get familiar with exactly how TerminusDB is started and perhaps expand upon it.
The commands (prefixed with $) are to be executed in CMD or Git Bash (see special commands below). All commands are expected to be run in the terminusdbLocalhost directory that you will create. The # prefix means it's a comment.
Let's set things up!
Step 1: Starting TerminusDB with a docker volume
In this section, we will create a directory, terminusdbLocalhost. In it, we create a docker-compose.yml file to contain a definition for how containers and storage connect to one other. Then we create the storage volume and load the container definitions into Docker to start them up.
Let's do this step by step!
Create the docker-compose.yml
Create a directory to keep your TerminusDB-related files and folders: terminusdbLocalhost. Create a file called docker-compose.yml in the terminusdbLocalhost directory with echo > docker-compose.yml in CMD and open it with Notepad.
Make sure it has a .yml only extension and not .yml.txt as it will not work otherwise. Also, when running the docker-compose commands, you need to be located in the terminusdbLocalhost directory.
Create the docker-compose.yml file with the following contents:
version: "3.5"

services:
  terminusdb-server:
    image: terminusdb/terminusdb-server:latest
    restart: unless-stopped
    ports:
      - "127.0.0.1:6363:6363"
    environment:
      - "TERMINUSDB_SERVER_PORT=6363"
      - "TERMINUSDB_ADMIN_PASS=$TERMINUSDB_ADMIN_PASS"
    volumes:
      - terminusdb_volume:/app/terminusdb/storage

volumes:
  terminusdb_volume:
    external: true
What we tell docker to do is create a container from the latest terminusdb image and attach it to network port 6363 on localhost. TerminusDB is set to start automatically as Docker is started, unless the container is stopped again.
It will read its initial admin password from the environment variable TERMINUSDB_ADMIN_PASS in the .env file, see the next section.
When starting the container, Docker will look for a data volume called terminusdb_volume to store its data in (it is external to the docker-compose file). If the volume does not exist, docker will fail to start TerminusDB.
If you use git to version your files, make sure to immediately create a .gitignore file to protect your password. Add an entry for .env to it so that you do not check in your admin password by mistake later:
# This is the .gitignore file
.env
Create a .env file for the initial password
In the same terminusdbLocalhost directory, create a .env file to keep environment variables in. This file is loaded automatically by docker-compose when starting up TerminusDB. The .env file should contain the initial password for the TerminusDB admin user.
Create a file .env in the same folder as the docker-compose.yml file:
TERMINUSDB_ADMIN_PASS=passw
With the above file, your password will be set to passw for your admin user, the first time TerminusDB is started.
Create a docker volume
If you have followed instructions above, you should have two files in your terminusdbLocalhost directory.
If you use Git Bash, you need to use the command ls -a to see hidden files with the dot prefix. It should look something like this, where . and .. are current and parent directory respectively:
$ ls -a . .. .env docker-compose.yml
Now you will need to create a data storage volume to store your TerminusDB database files.
This data storage volume is independent of the docker-compose.yml file, and lives inside of the docker virtual machine as an object of its own.
$ docker volume create terminusdb_volume
terminusdb_volume
You should be able to see it using the following command:
$ docker volume ls
DRIVER    VOLUME NAME
local     terminusdb_volume
Starting TerminusDB
By now you should have all things necessary to start TerminusDB with docker-compose, including a storage volume. TerminusDB will automatically create its database storage files in the terminusdb docker volume and create a new admin user, with the password supplied through the environment variable TERMINUSDB_ADMIN_PASS.
This command will start TerminusDB as part of the terminusdb-server container.
$ docker-compose up -d
Wait for TerminusDB to start, then you should be able to connect to it on http://localhost:6363/, login with admin:passw and see the TerminusDB dashboard.
Verify the docker volume is used by scratching the container
To verify that the database was created on the indepedent volume in Docker, now bring the docker-compose environment down and then up again (this will recreate the container):
$ docker-compose down

$ docker-compose up -d

# To make this faster, you could also just recreate the container itself:
$ docker-compose up -d --force-recreate terminusdb-server
You should now have a running TerminusDB instance on localhost. Up next is to learn how to make backups of it.
Step 2: Backup and restore TerminusDB on localhost
When running TerminusDB on localhost, make sure to keep backup copies of your TerminusDB storage to protect from failures.
The database backup and restore instructions for the docker volume assumes TerminusDB is offline when copying for consistency. Do verify that the backup instructions work for your use case before relying on them!
TerminusDB stores its on-disk database in binary format, thus you will not be able to introspect the JSON-LD contents by inspecting the offline database. The JSON-LD documents in the user interface are in fact made up of triples are assembled based on the schema into JSON-LD representations.
Read more about the TerminusDB database internals on the TerminusDB blog.
Take a look at the contents of the TerminusDB volume
We will use the base ubuntu container to work with the files in the Docker TerminusDB storage volume. We can look at the files on the storage volume using below command that launches the ls command for a directory on the storage volume:
$ docker run --rm -it -v terminusdb_volume:/terminusdb ubuntu ls -l ./terminusdb/db
The --rm flag means that the temporary ubuntu container (not the TerminusDB one) we take the ls command from, will be deleted again after the command.
Make a compressed database backup
We will stop terminusdb, make a compressed archive of the TerminusDB database into a file backup.tar.gz in the same folder as the docker-compose.yml file, and then start terminusdb again:
Note, if you use Git Bash, please scroll to the Git Bash commands instead!
$ docker-compose stop terminusdb-server

$ docker run --rm -it -v "$PWD":/backup -v terminusdb_volume:/terminusdb ubuntu tar cfz /backup/backup.tar.gz /terminusdb

$ docker-compose up -d terminusdb-server
Make a database restore to a separate instance and port
Let's restore the database we created, into a new container running on port 6364.
Update the docker-compose.yml file with below contents:
Note, if you use Git Bash, please scroll to the Git Bash commands instead!
version: "3.5"

services:
  terminusdb-server:
    image: terminusdb/terminusdb-server:latest
    restart: unless-stopped
    ports:
      - "127.0.0.1:6363:6363"
    environment:
      - "TERMINUSDB_SERVER_PORT=6363"
      - "TERMINUSDB_ADMIN_PASS=$TERMINUSDB_ADMIN_PASS"
    volumes:
      - terminusdb_volume:/app/terminusdb/storage

  terminusdb-restored:
    image: terminusdb/terminusdb-server:latest
    restart: unless-stopped
    ports:
      - "127.0.0.1:6364:6363"
    environment:
      - "TERMINUSDB_SERVER_PORT=6363"
      - "TERMINUSDB_ADMIN_PASS=$TERMINUSDB_ADMIN_PASS"
    volumes:
      - terminusdb-restored:/app/terminusdb/storage

volumes:
  terminusdb_volume:
    external: true
  terminusdb-restored:
    external: true
Create the restore volume and restore the local database into it, and start the terminusdb-restored container which will now be available on localhost port 6364.
$ docker volume create terminusdb-restored

$ docker run --rm -it -v "$PWD":/restore -v terminusdb-restored:/terminusdb ubuntu tar xvfz /restore/backup.tar.gz

$ docker run --rm -it -v terminusdb-restored:/terminusdb ubuntu ls -l ./terminusdb/db

$ docker-compose up -d terminusdb-restored
Now that you have created the restored volume and started a second TerminusDB instance, terminusdb-restored, you can access the restored data http://localhost:6364/
Special instructions for Docker Git Bash users
When you use Git Bash to run Docker, Windows paths get transparently converted to Unix paths. This works well in most cases, but creates problems for tools like Docker.
Make sure your docker-compose.yml file is updated according to the section above!
The Git Bash commands for backup
When running the docker commands in Git Bash, you need to adjust for the cross-context execution of Docker. The backup commands corrected for Git Bash looks like this:
$ docker-compose stop terminusdb-server
$ MSYS_NO_PATHCONV=1 docker run --rm -it -v "$PWD":/backup -v terminusdb:/terminusdb ubuntu tar cfz /backup/backup.tar.gz /terminusdb
$ docker-compose up -d terminusdb-server
The Git Bash commands for restore
REVIEW FOR ACCURACY
When running the docker commands in Git Bash, you need to adjust for the cross-context execution of Docker. The restore commands corrected for Git Bash looks like this:
$ docker volume create terminusdb-restored
$ MSYS_NO_PATHCONV=1 docker run --rm -it -v "$PWD":/restore -v terminusdb-restored:/terminusdb ubuntu tar xvfz /restore/backup.tar.gz
$ MSYS_NO_PATHCONV=1 docker run --rm -it -v terminusdb-restored:/terminusdb ubuntu ls -l ./terminusdb/db
$ docker-compose up -d terminusdb-restored
Step 3: Connecting DFRNT to your localhost instance
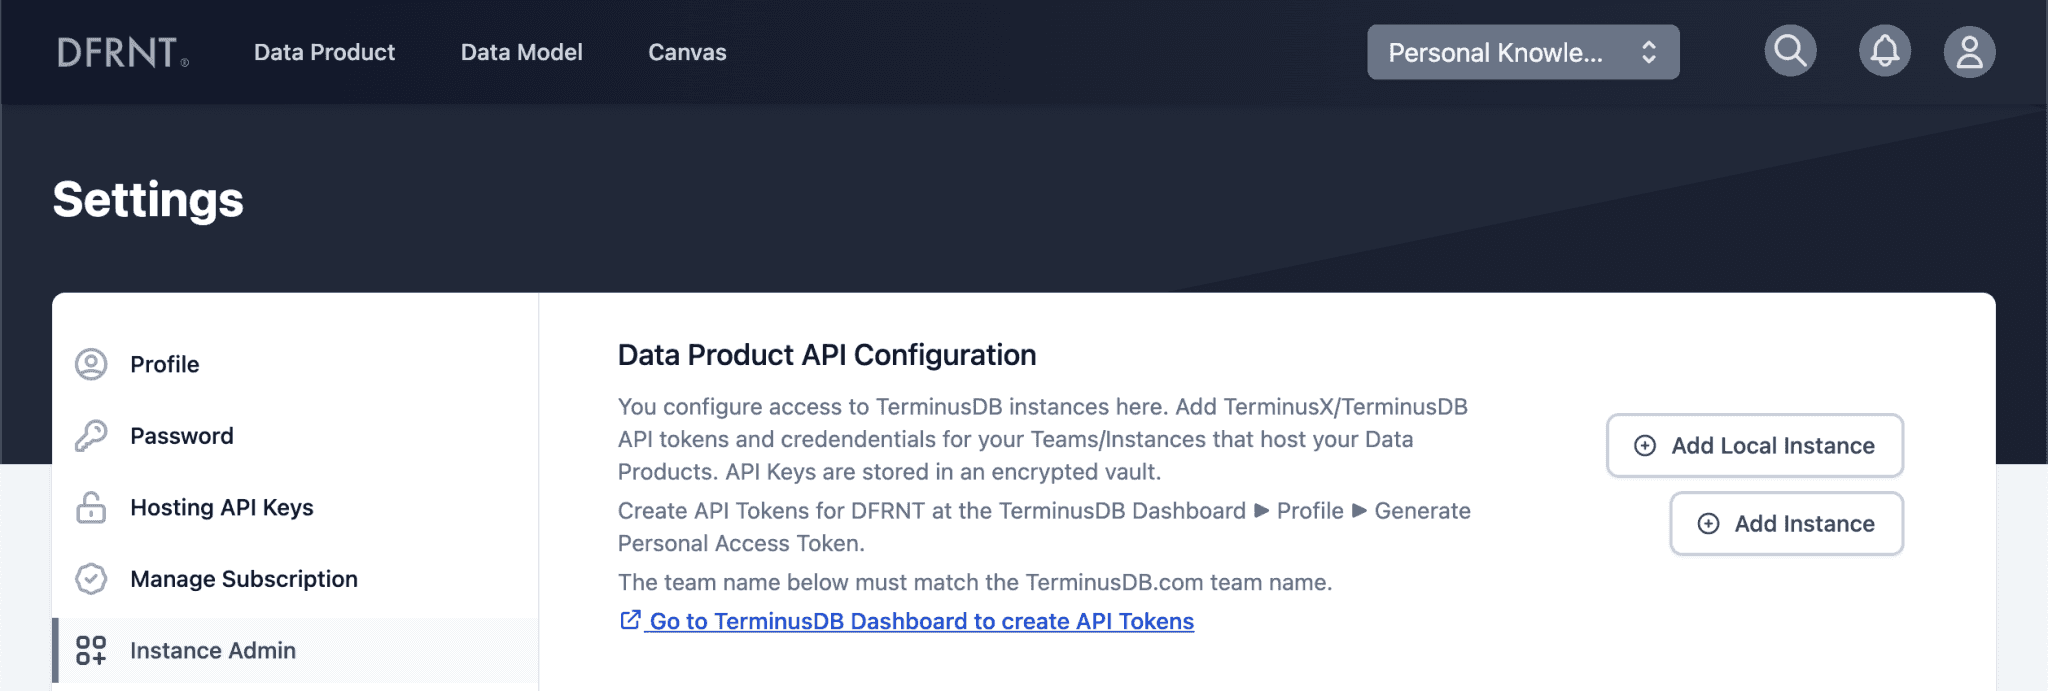
To connect DFRNT to your localhost instance, head over to the DFRNT settings page and the Instance Admin section.

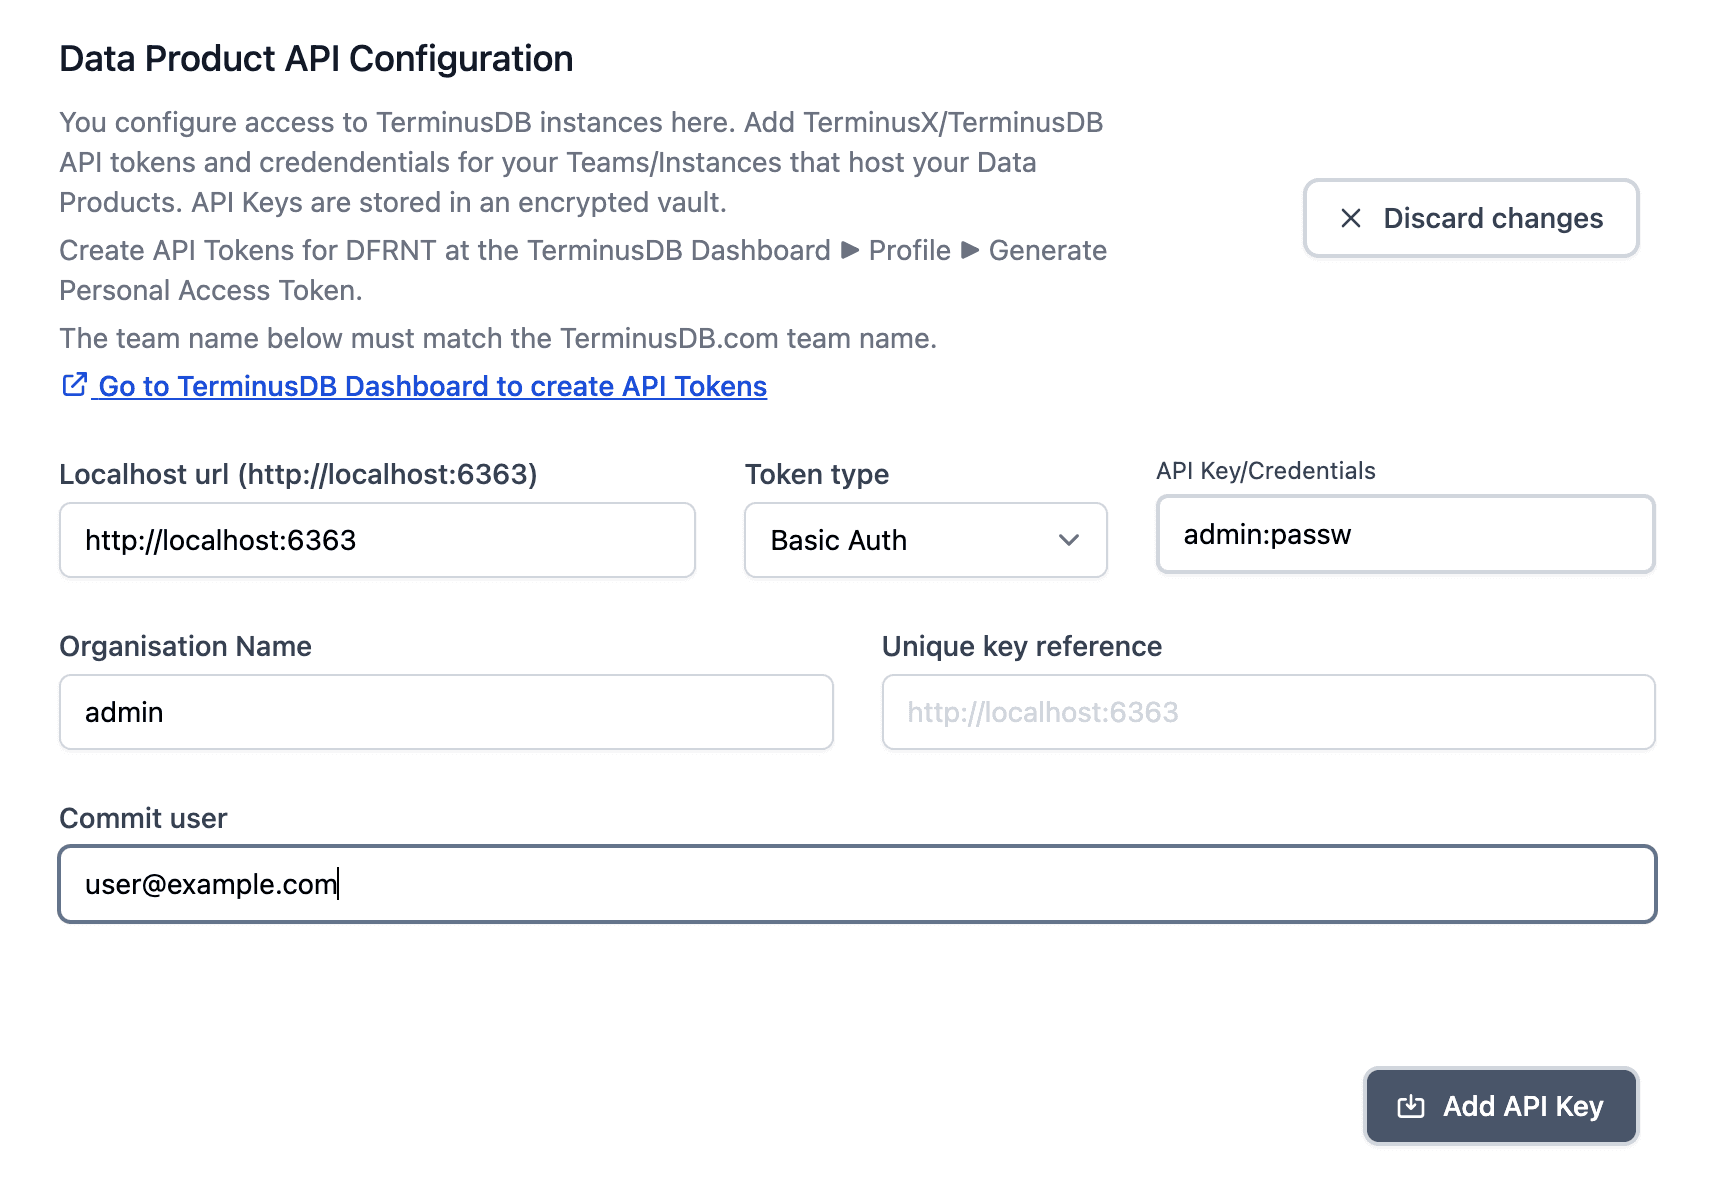
Click Add Local Instance (at https://dfrnt.com/modeller/settings/apikeys), set the URL to http://localhost:6363, token type to Basic Auth, and the Credentials to admin:passw, changing passw to your personal password, as configured previously. The organisation is normally admin, so don't change that, and set the commit user to be your email address to commit as.

Click Add API Key. Now you need to either create a pointer to an existing data product, or create a new data product.
In the left panel, you should have an admin menu entry. In it you have options to create data products, and create landing page branch pointers to existing data product branches.
Conclusion
In this blog post, we learned to use TerminusDB on Windows with the help of Docker, and connect localhost instances to DFRNT.


